Is your classic Upper West Side apartment long on charm but short on today’s buyer appeal? You’re not alone. Many sellers wonder how to honor prewar character while meeting modern expectations for light, function, and clean finishes. In this guide, you’ll learn practical, cost‑smart steps to stage your co‑op or condo so it feels fresh, flexible, and move‑in ready. Let’s dive in.
What today’s UWS buyers expect
Upper West Side buyers love original details like high ceilings, crown moldings, hardwood floors, and large windows. They also look for modern comfort. Clean lines, strong lighting, updated or well‑maintained kitchens and baths, visible storage, and a clear layout for daily life rank high.
You can win attention by showing how the home supports real life on the UWS. Think easy access to parks and culture, space for a home office, and flexible rooms that work for entertaining and family time. Staging should highlight character, boost light, and make the floor plan feel intuitive.
Start with fast, high‑impact fixes
Small improvements can change buyer perception in days. Begin with the basics.
Declutter and show storage
- Remove extra furniture to open sightlines and circulation.
- Clear counters, pare down bookshelves, and trim collections.
- Edit closets to one‑third capacity and add simple organizers or baskets to show usable storage.
Deep clean and fresh paint
- Schedule a professional deep clean so every surface shines.
- Touch up or repaint with warm neutrals, creamy whites, soft grays, or greige. A cohesive palette helps classic trim and millwork pop.
- Repair nail holes, scuffs, and tired caulk so the home reads well maintained.
Lighting and window treatments
- Clean windows inside and out, and keep treatments light and simple.
- Layer overhead, floor, and table lamps to reach corners and long rooms.
- Select LED bulbs around 2700 to 3000 K for living spaces and slightly cooler for a work area. Verify bulb specs when sourcing.
Room‑by‑room staging playbook
Entry and foyer
First impressions count. Keep the foyer clear and bright. A slim console, mirror, and a small tray signal function while showing scale. If your building offers a doorman or updated lobby, you can note that in printed materials, but keep the entry itself calm and welcoming.
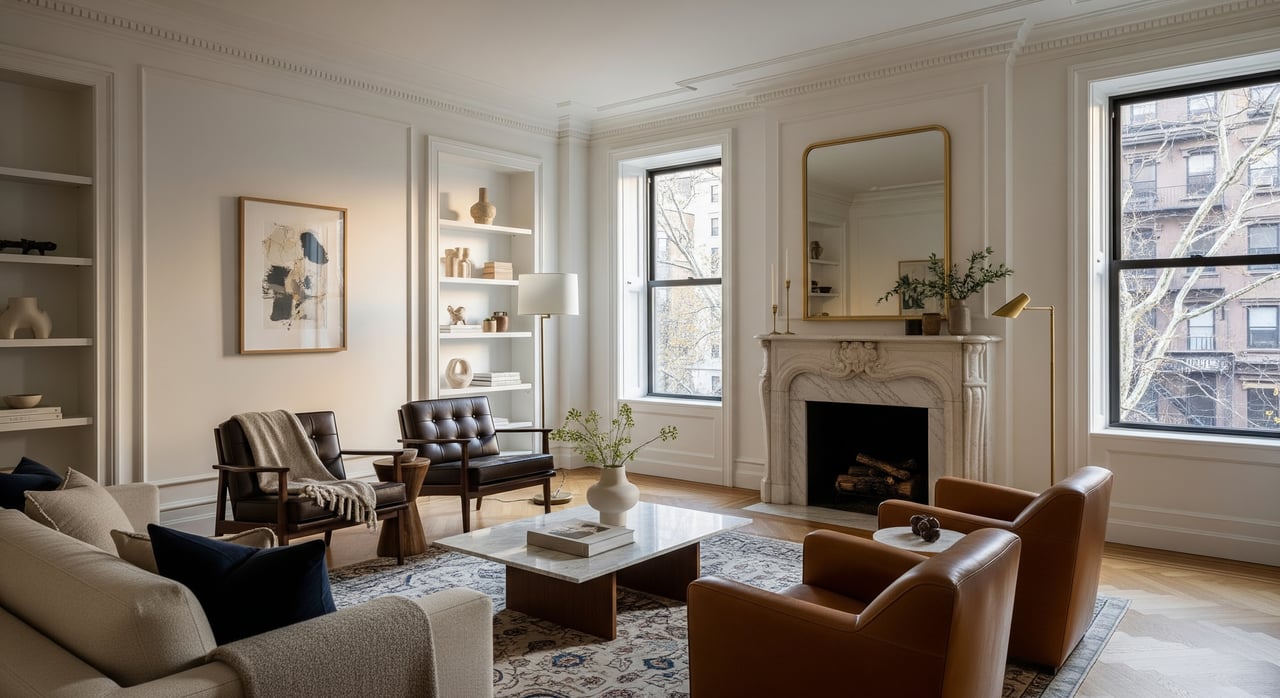
Living room or parlor
Use furniture that sits a bit lower so moldings and ceiling height remain the stars. Float a conversation grouping that protects paths to windows and adjacent rooms. Add layered lighting and replace a dated fixture with a simple, modern option if allowed by building rules.
Dining room or dining zone
Define the dining area with an appropriate table and a scaled rug that shows off original wood floors. If a formal dining room is not practical, stage a flexible setup that works for daily meals and occasional entertaining or work‑from‑home.
Kitchen
Focus on easy wins that show care and function:
- Deep clean, regrout, and recaulk where needed.
- Swap dated cabinet hardware and add a modern faucet.
- Update lighting for brighter prep zones.
- Streamline counters and style with a few quality accessories.
If the kitchen is very compact or dated, stage tidy storage solutions and keep materials on hand that outline a simple renovation path. A mood board or sample finishes can help buyers see potential without committing to a full project.
Bathrooms
Cleanliness is non‑negotiable. Regrout, recaulk, and polish all surfaces. A new mirror, brighter vanity light, and refreshed fixtures can read as an update. Choose crisp white towels and minimal art for a spa‑like feel.
Bedrooms
Right‑size the furniture so rooms feel spacious. Neutral bedding, two matching side tables, and limited decor create calm. Edit closets and consider adding simple organizers to show capacity. Remove bulky pieces that crowd circulation.
Home office or flex space
UWS buyers often ask where a desk will go. Stage a real work zone in one credible spot. That can be a windowed nook, a guest room with a compact desk, or a corner of the living room balanced by a rug to define the area. Show that the home flexes for changing needs.
Color, floors, and finishes that sell
Classic architecture shines against a soft, cohesive palette. Choose warm neutrals or creamy whites throughout to help rooms flow together. Limit accent walls and let moldings and trim deliver the character.
Original hardwood is a selling point. If possible, refinish or professionally clean it. Use area rugs to define seating while leaving enough exposed wood to showcase quality.
When to stage vs renovate
Not every home needs a gut renovation to compete. Use this framework to decide where to invest.
Cosmetic staging only
Great for solid homes that need a quick refresh. Focus on paint, lighting, hardware, deep cleaning, and smart furniture placement. This level often delivers a strong lift in online photos and in‑person tours.
Minor targeted upgrades
Consider kitchen hardware, new faucets, simple countertop or backsplash swaps, updated bath fixtures, lighting, and floor refinishing. These upgrades can bring a home to move‑in ready in many price brackets, especially when paired with strong staging.
Major renovation
Full kitchen or bath overhauls and layout changes require careful math and timing. For co‑ops, board approvals can be significant, and some changes may need permits from the NYC Department of Buildings. Only pursue large projects when the expected sale price clearly justifies the cost and time.
Keys to the decision
- Compare your listing to similar active homes. If most comps are fully renovated at your price band, buyers may expect turnkey condition.
- Consider your target buyer. Higher tiers tend to demand updated finishes. In mid tiers, buyers may accept a project if the price reflects it.
- Weigh timeline, disruption, approvals, and realistic ROI. Small, visible improvements often punch above their cost.
For general buyer preferences and staging impact, explore research from the National Association of Realtors.
Work within co‑op and condo rules
Many Upper West Side residences are co‑ops with stricter alteration agreements. Confirm your building’s policies before planning any work beyond cosmetics. Boards often require contractor insurance, approved work hours, and a detailed scope. Structural, plumbing, or major electrical changes typically need permits from the NYC Department of Buildings.
If your building was built before 1978, federal rules generally require lead‑based paint disclosures for sellers. Review guidance from the U.S. Environmental Protection Agency and keep any records you have available for buyers.
Some buildings lie within historic districts. Exterior and certain interior elements may face restrictions. Your building management, attorney, or a licensed contractor can advise on what is feasible.
Logistics, vendors, and a smart timeline
A smooth plan keeps your launch on schedule and reduces stress. Here is a simple sequence that works well on the UWS.
- Consultation and strategy
- Walk the home with a local expert and a stager. Prioritize cosmetic work and define which rooms to stage.
- Decide whether to add minor upgrades like lighting swaps or new hardware.
- Scheduling and access
- Coordinate elevator reservations, certificates of insurance, and vendor hours with building management.
- Secure at least two to three quotes for any paid improvement.
- Execution and install
- Complete paint, lighting, and small fixes first.
- Deep clean, then install staging. Finish with professional real estate photography.
- Go to market
- Launch with strong visuals and a clear showing plan.
With good coordination, paint, lighting, cleaning, and staging can often wrap in one to three weeks. Larger projects that require approvals or permits can take months.
Professional staging and scope options
Not all staging is all‑or‑nothing. Options include consultation only, partial staging for key rooms, or full staging for the entire unit. Vacant apartments and homes with very dated decor benefit most from full staging. For occupied homes, a consult plus selective staging often yields strong results without major disruption. When selecting a company, ask for before and after photos, inventory suited to prewar architecture, and local references.
Compass Concierge can extend your budget
If you want to improve your listing without upfront cash, programs like Compass Concierge can help. The general model fronts approved costs for pre‑sale improvements such as staging, paint, lighting updates, and minor repairs. Repayment typically occurs at closing. Terms, eligibility, vendors, and services vary, so confirm current details with your agent and the brokerage.
Photography and online first impression
Most buyers see your home online before they ever step inside. Staging sets the scene, but professional photography seals the first impression. Capture natural light, clear sightlines, and the details that make prewar homes special. Clean lines, simple styling, and consistent tones will read best across listing sites and marketing.
Bring it all together
Your goal is simple. Let the apartment’s prewar character shine while showing a clear, modern way to live. Start with decluttering, deep cleaning, fresh paint, and layered lighting. Add targeted kitchen and bath updates if needed. Stage with scaled furniture, flexible zones, and just enough warmth to feel inviting.
If you want a tailored plan for your Upper West Side home, reach out. As a neighborhood‑focused agent with Compass resources and trusted vendors, I can coordinate the right prep for your goals and timeline. Connect with Darya Goldstein to get started.
FAQs
What do Upper West Side buyers value in prewar homes?
- Buyers appreciate original details like moldings and hardwood, paired with modern comfort. Clean finishes, good lighting, updated or well‑kept kitchens and baths, and flexible work or family zones rank high.
How can I make a deep prewar layout feel brighter?
- Declutter, keep window treatments light, and add layered lighting with warm LED bulbs. Arrange furniture to preserve clear sightlines and avoid blocking windows.
Should I renovate my kitchen before selling a UWS co‑op?
- Often, small upgrades like hardware, lighting, faucet swaps, and deep cleaning deliver strong impact. Consider a full renovation only if comps demand it and board approvals and timelines make sense.
What are common building rules that affect staging?
- Many co‑ops require alteration agreements, contractor insurance, and set work hours. Structural and major system changes may need permits from the NYC Department of Buildings.
Do I need to worry about lead paint in a prewar apartment?
- If the property was built before 1978, federal lead‑based paint disclosures generally apply. Review guidance from the U.S. Environmental Protection Agency and share any records you have.
How fast can I complete paint, lighting, and staging?
- With good coordination, many cosmetic updates and a full staging install can be finished in one to three weeks. Larger projects that need approvals can take longer.
